DriveEZ Help

DriveEZ Help

Simplify, Streamline, Succeed

FAQ

1. If my payment option is cash, whom should I give the cash to?
You should hand the cash to the school administrator who provided you with the payment link.

2. If my payment option is bank transfer, which account should I send the money to?
Please verify the school’s bank account details with the administrator before initiating the payment.

3. How do I send my instructor the pick-up location for my driving classes?
In the session created for you, there is an option to add or edit the pick-up location. Simply click on this option and input your address.

4. Why am I asked to activate and pay for my account?
To fully access the app, including schedule management, a one-time activation fee is required.

5. Where can I view my schedules?
Your schedules will be displayed on the home page and in the “My Schedules” section once they are created by your instructor.

6. Will I receive a receipt for online payments?
Yes, after completing your payment, a receipt will be available in the “Invoices and Receipts” section of your profile.

7. Can I pay with my card?
Yes, you can pay using a credit or debit card.

8. How can I request a slot booking for the course I purchased?
Please contact your school administrator to inform them of your preferred slot.

9. Where can I find the course certificate?
Once your course is complete and the school administrator has uploaded it, the course certificate will be listed in your profile’s “Documents” section.

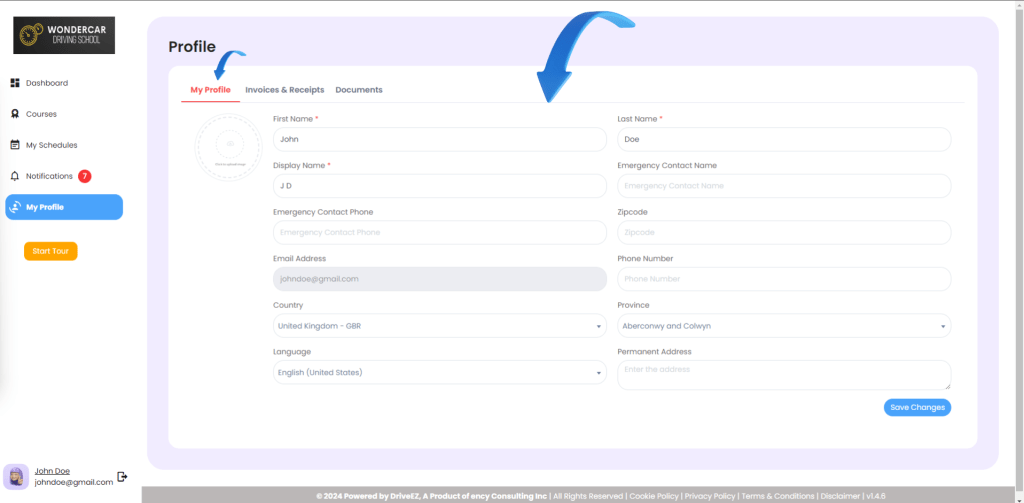
10. How do I update my phone number?
In the ” Profile ” section, you can update your phone number and other profile details, such as your address and emergency contact information.

11. How do I request a reschedule?
Contact your instructor and provide the necessary details for rescheduling.

12. Can I use the app in my local language?
Yes, you can select your preferred language from the available options in the “Profile” section, and the app will display the content in that language.

Signing In / Signing Up / Changing Passowrd

Signing Up

To sign up, first click on the sig up button as pointed out by the arrow.

Then, fill out the details in the provided fields, and click on the blue sign up button as pointed out by the arrow.

Signing In

To sign in, first fill out your email address and password in the provided fields, then click on the blue Log in, button to login.

Forgot Password

If you have forgotten the password, follow the following steps to reset it.

First, click on the blue button that reads, ‘Forgot Password’, as pointed out by the arrow.

Then, fill out your email address in the provided field and click on the orange reset password button as pointed out by the arrow. You will then receive an email with instructions to reset your password.

Resetting Password

To reset your password, first click on your account at the bottom left of the screen as pointed out by the arrow.

  1. Click on the button that says, ‘Security’ to navigate to the reset password page.
  2. Fill out your current password in the provided field.
  3. Fill out your new password in the provided fields.
  4. Click on the blue button the says, ‘Save Changes’ to reset your password.

Dashboard and Navigation

  1. Navigation Bar: You can navigate through the software using this menu.
  2. Tour: You can take a guided, detailed tour of the software by clicking on this button.
  3. Account Settings / Log Out: You can dive deeper into account settings / logout by clicking on this button.
  4. Active Courses: in this section you can view all your active courses, as well as see your course progress.
  5. Scheduling: In this section, you can view all your upcoming scheduled classes, as well as see your completed classes.
  6. Notes: in this section you can view all the notes that have been sent to you by your instructor as well the notes you have sent back.
  7. Course list: In this section, you can view all the courses offered by your driving school.
  8. Document Upload: Through this section, you can upload documents required by your school by clicking on the blue ‘upload’ button, as well as view previously uploaded documents by clicking on the red ‘View All’ button.
  9. Invoices / Receipts: Through this section you can view / download all your invoices and receipts.

Activation

Step 1: Activating your new Student Account

Click on the green button at the top ribbon displaying, ‘Pay Now’.

Step 2: Filling out information

Fill out your information in the provided fields, and then click on the next button.

Step 3: Choosing Payment Method

Choose your payment method, and then proceed to choosing your payment gateway.

Step 4: Entering Card Details

Enter your card details in the provided fields, and click on pay now to complete the payment.

*Please Note: No card details are stored, and deleted after transaction is completed.*

Step 5: Congratulations, Your New Student Account is Now Activated

Course Registration

Step 1: Viewing Available Courses

You can view the available courses either by glancing on the right hand side of the dashboard, or by clicking on the courses section in the left hand side navigation bar.

Step 2: Buying a Course

Simply click on the blue button displaying, ‘Buy Now’, on your chosen course to start the purchasing process.

Step 3: Filling out information

Fill out your information in the provided fields, and then click on the next button.

Step 4: Choosing Payment Method

Choose your payment method, and then proceed to choosing your payment gateway.

Step 5: Entering Card Details

Enter your card details in the provided fields, and click on pay now to complete the payment.

*Please Note: No card details are stored, and deleted after transaction is completed.*

Step 6: Congratulations, you have Successfully Purchased and Enrolled in your desired course.

Step 7: Viewing your Course

You can now view your course progress and details on your dashboard.

Scheduling

Step 1: Viewing your Schedule through the Dashboard

You can view all your upcoming classes through the dashboard, you can also click on the ‘My Schedules’ button on the left hand side navigation bar to go to the scheduling page.

Step 2: Viewing your Schedule through the Scheduling Page.

From the scheduling page, you can:

  1. View your upcoming classes on a daily, weekly, and custom basis. You can navigate these different views through the menu at the stop of the page as directed by the blue arrow.
  2. View the location of your class / pickup point, by clicking on the blue button displaying, ‘map’, next to your class.

Step 3: Sending a Cancel Request, Adding / Viewing Class Notes.

You can send a Cancel Request and Add / view your class notes, by clicking on the 3 dots next to your scheduled class.

Notifications

Viewing Notifications

    Through the Notification page, you can:

    1. View Unread, Read, and all notifications, you can further segregate these by choosing the different options through the buttons at the top left of the page, pointed out by the arrow.
    2. Mark Notifications as read by, clicking on the small button with the ‘Mail Icon’ to the right of the notification, as pointed outby the arrow.
    3. Cycle through pages of notifications by, clicking on the numbered buttons at the bottom right of the page, as pointed out by the arrow.

    Changing Notifications Settings

    To change your notification’s settings, first, navigate to the settings page by clicking on your account at the bottom left of the page, as pointed out by the arrow.

    On this page, you can toggle the different notifications settings, once satisfied, click on the blue sabe changes button to save your new preferences.

    Profile / Invoices / Documents

    Step 1: Navigating to your Profile

    Click on the button displaying, ‘My Profile’ on the left hand side Navigation Menu.

    Step 2: Viewing / Editing your information.

    From this Section of the profile, you can View / edit your information. Once satisfied, click on Save changes at the bottom right of the screen to update your information.

    Step 3: Viewing / Downloading your Invoices

    From this section, you van view and download your invoices / receipts. Simply click on the buttons on the right side of the invoices to download them to your device.

    Step 4: Viewing / Uploading your Documents

    From his Section you can,

    1. View your uploaded documents.
    2. Delete your uploaded documents, by clicking on the red ‘trash can’ button, next to your document.
    3. Download your uploaded document, by clicking on the purple ‘download’ button, next to your document.
    4. Upload new documents, by clicking on the ‘upload document’ at the top right of the page, and then, uploading a file from your computer and giving it a title.